Tutorial
Step 1 – Enter your plugin license
To get started with Project Creation Tool v2, you need to enter your plugin license. Begin by logging into the CatDV Server administration interface and navigating to the "Server Settings" section. In the "Advanced" tab, append the license code in the following format:
catdv.project_template.licence_code=[put your license code here]
After entering the license code, make sure to click "Save" to apply the changes. You will then need to restart the CatDV server for the license to take effect. Once the server restarts, you should see the new options for "New Project Template" and "Configure Project Template" in the tools menu, indicating that the license has been successfully loaded.
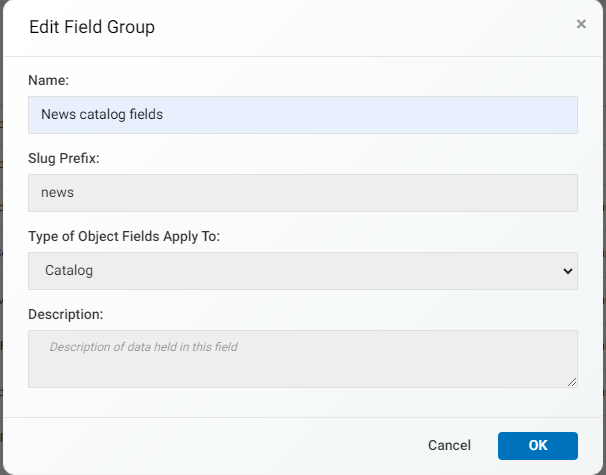
Step 2 – Create a Catalog Field group
Organize your catalog metadata by creating a Catalog Field Group. This enables you to manage your metadata fields and keep related fields together.
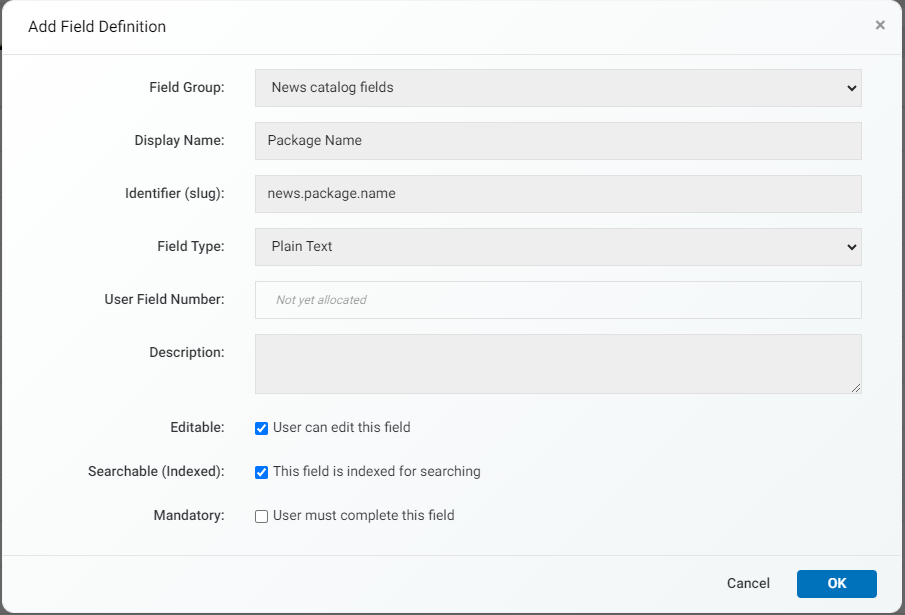
Step 3 – Create a Catalog Field
Once you’ve created a Catalog Field Group, you can now define your own Catalog fields. This allows you to add and customize metadata fields within the group to meet your specific needs.
For details on supported field types and setup instructions, refer to the Catalog Field Types and Setup Guide.
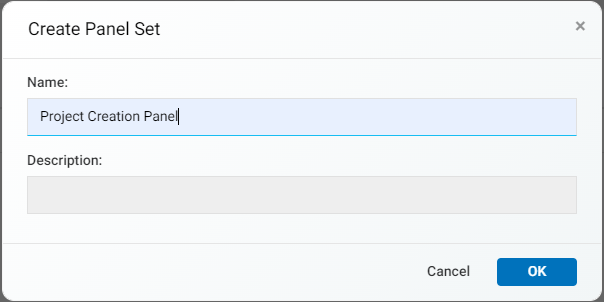
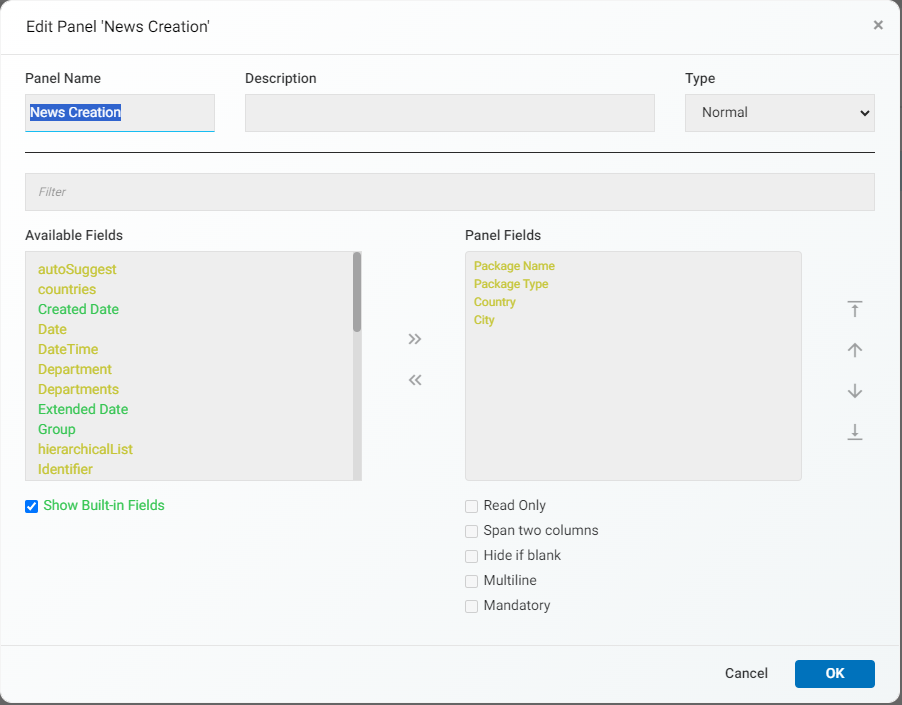
Step 4 – Create a Catalog Panel Set & Panel Fields
In this section, you configure a Catalog Panel Set and Panel Fields, which will appear as a pop-up dialog when users click "Create Project." This dialog ensures users enter all necessary metadata before successfully creating a project. Make sure to select "Catalog" as the Object Type before clicking "+New" to create the Catalog Panel Set.

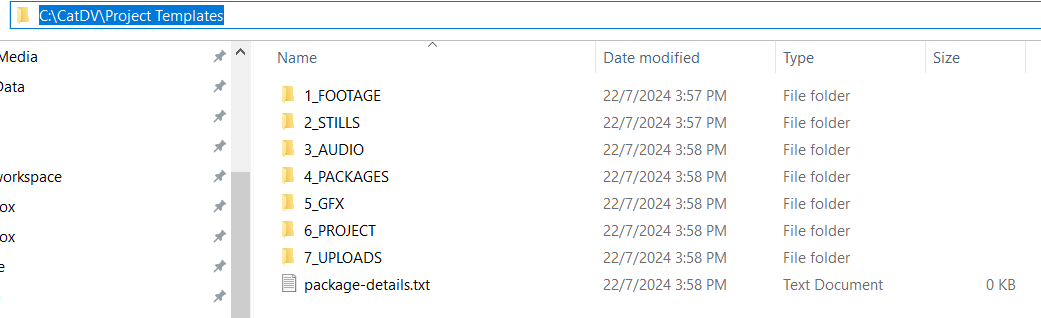
Step 5 – Create a template folder
After defining your Panel Sets and Panel Fields, set up a Template Folder to establish a standardized folder structure for your projects.
· Multi-Level Structure: You can create a nested folder structure to meet your project needs.
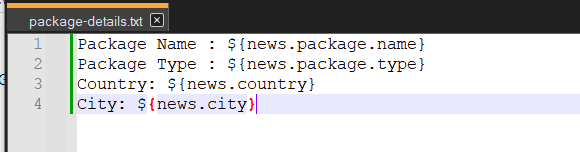
Expand Variables: Customize folder and file names dynamically using variables. Invalid characters in filenames will be automatically normalized. Refer to the Expand Variables Guide for supported variables.
You can use variables in your file names and contents.

Step 6 – Create and configure Project Template
Log in as a CatDV Administrator to create and configure a project template. Only administrators will see the options for 'New Project Template' and 'Configure Project Template'. Click on 'New Project Template' to start creating a new template.
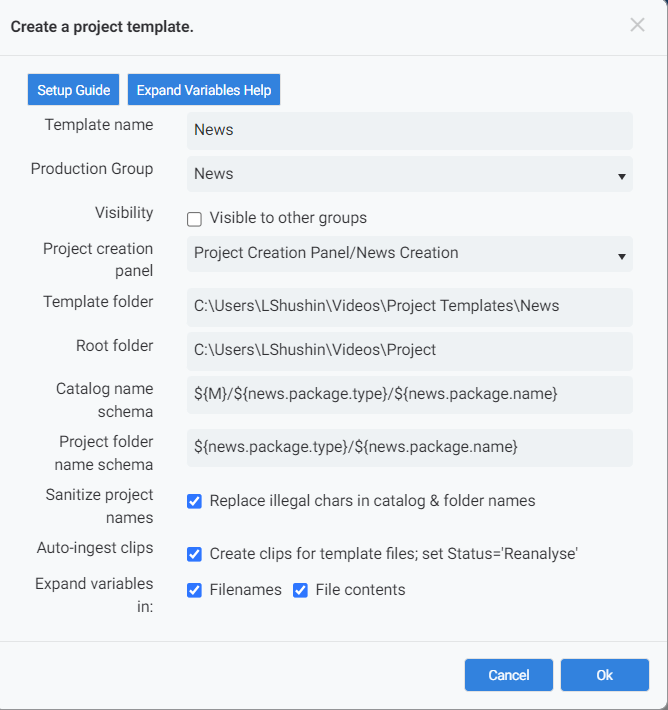
When creating a project template, you provide:
Template name | The name you assign to the template, used to identify and differentiate it when creating new projects. |
Production group | The category or team in which new projects will be organized and managed. |
Visibility | Determines whether the project or template is accessible to or can be seen by production groups other than the one it was created for. |
Project creation panel | The interface or section used for setting up and configuring new projects, including inputting details and selecting options. |
Template folder | A predefined folder on the file system containing subdirectories and template files, used as a base structure for creating new project folders. |
Root folder | The primary directory where new project folders will be created and stored. |
Catalog name schema | The naming convention used to generate catalog names for new projects. |
Project folder name schema | The naming convention used to generate the names of new project folders. |
Sanitize project names | Replaces invalid characters in catalog and folder names to ensure compatibility. Only the following characters are considered valid: · Digits (0-9) · English alphabet characters (both uppercase and lowercase, a-z and A-Z) · Underscore (_) · Parentheses (( and )) · Percent sign (%) · Backslash (\) · Hyphen (-) · Whitespace characters (space, tab, newline) · Dot (.) Any character not included in the above list will be replaced with an underscore (_) to maintain a clean and consistent naming format. |
Auto-ingest clips | Automatically ingest clips when a new project folder is created. |
Expand variables in | Filenames - Allows the use of CatDV variables in filenames, enabling dynamic generation of file names based on project-specific data. File Content - Allows the use of CatDV variables within file contents, enabling the creation of customized files populated with project-specific information. |
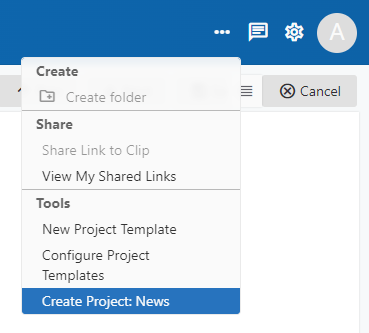
Step 7 – Re-login for changes to take effect
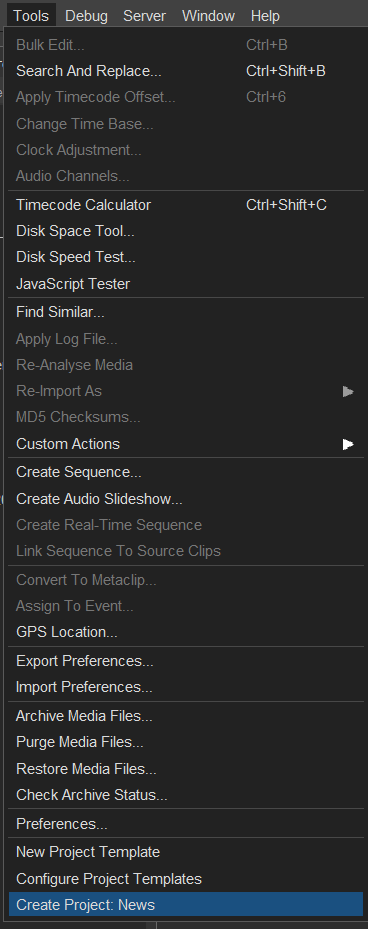
You will now have a new command on the Tools menu to create News projects
If you don’t see the "Create Project: New" option under your tools menu, ensure that the user has the necessary permissions for the project template's production group.
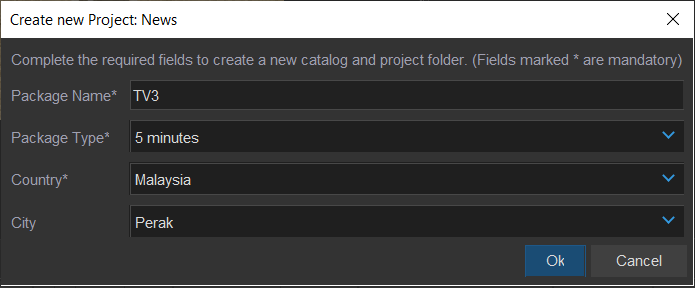
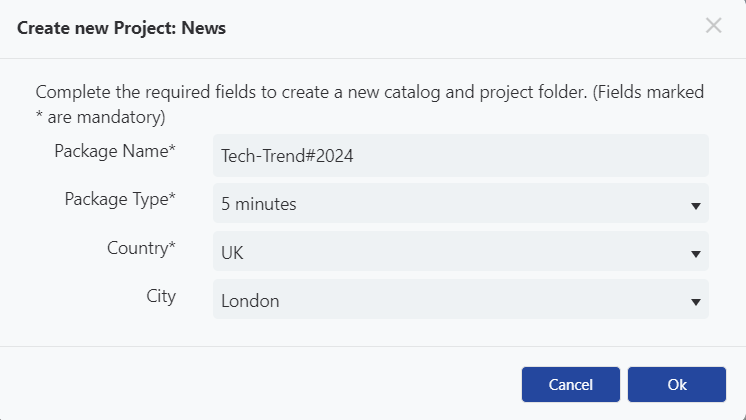
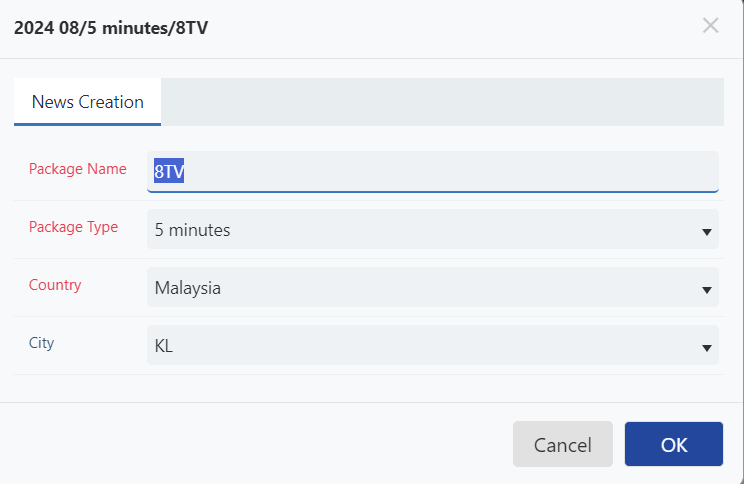
Step 8 – Create a News Project
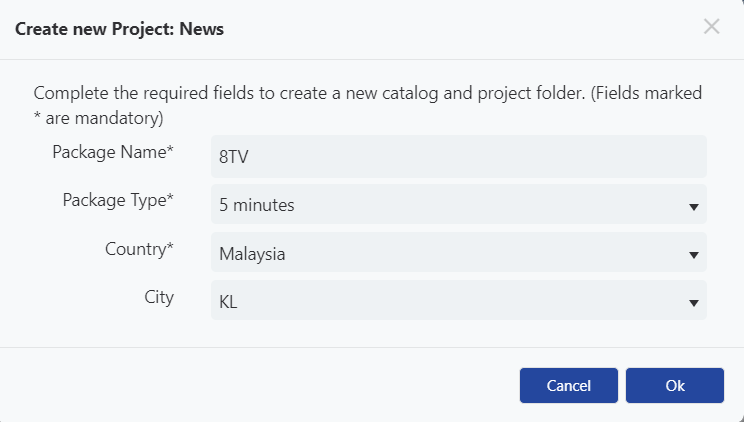
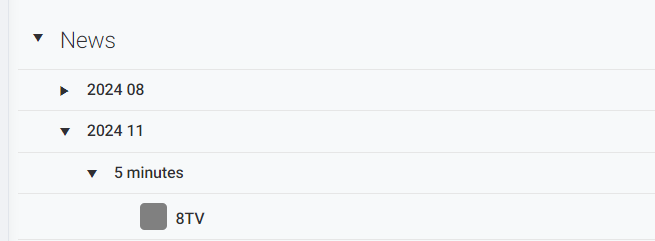
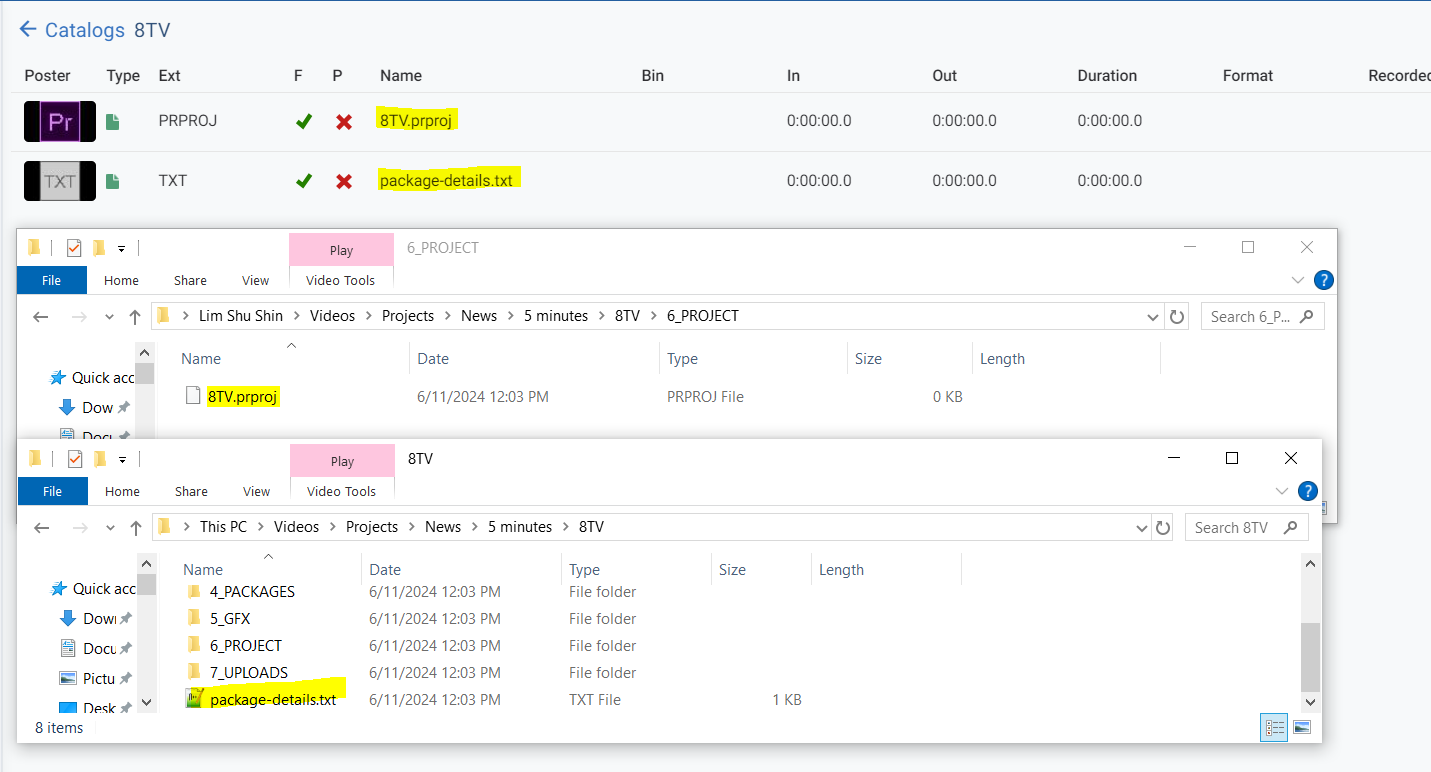
Notice how the catalog and folder names have been created based on the schemas. In our example we use ${news.package.type}/${news.package.name} to include the title provided by the user. $M to generate a year and month in format YYYYMM to create the catalog under a catalog folder based on the current month.
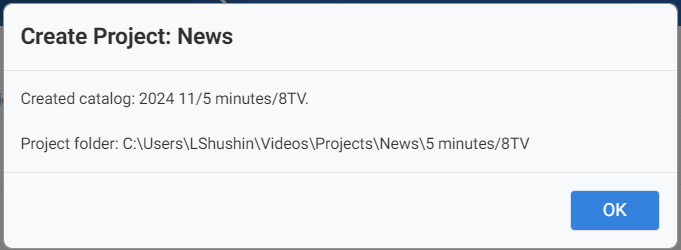
The catalog appears in the navigation bar after refreshing your browser:
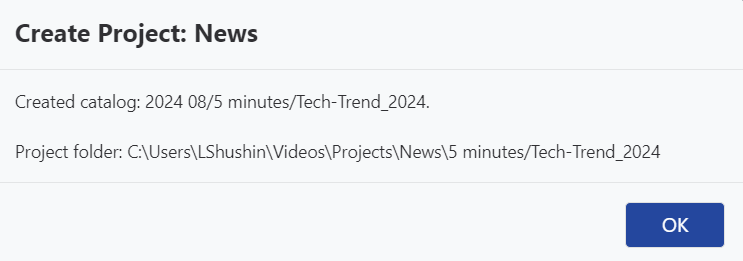
Your project will be created automatically with the same structure and settings defined in your project template:


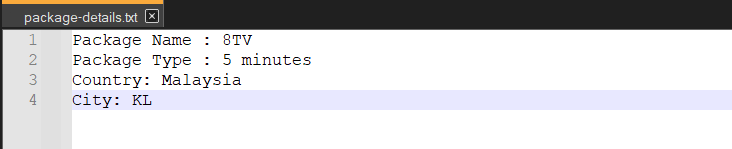
If you use expand variables in your project, the file names and file content will be dynamically replaced with the specified values:

Your filename variables will be normalized upon project creation. For example, if your package name is ‘Tech-Trend#2024’, where # is not an acceptable character, it will be replaced with an underscore, resulting in Tech-Trend_2024.
If you enable auto-ingest clips in your project, files created from the project template will be ingested automatically.
Click on the pencil button if you want to edit the catalog fields:

You may also create new project with Desktop client, you will find Create new Project under Tools menu: